Road King Passing Lamp Options
Frustrated by your factory wired passing
lamps which only operate on low beam?
Need more lighting at night for critter control?
John "FLSTFRIDER" shows us below how easily you can convert your part time lights to full time lights, by simply bridging a load line from the auxiliary switch source side to the passing lamp source side, eliminating control by the headlight. Now they are either always on or off, according to the switch position.
For those who want even MORE options with the lights, take a look at the multi function switch conversion offered by our UK friends at www.spiyda.com
These switches will give you your choice of off and any TWO options: High beam only / Low beam only / Full time. The perfect solution for those of us who must ride at night and don't want to blind oncoming traffic!!
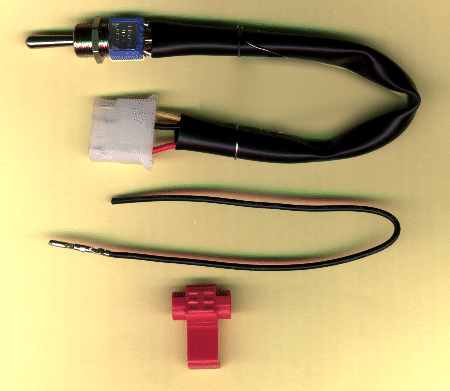
The new switch conversion kit from
Spiyda Designs is very well
put together, is an amazingly simple installation, as it includes instructions
that a complete novice can easily follow, and includes multiple options for how
you want your lights to work. If you can remove your nacelle, and own a pair of
pliers, Spiyda gives you all the skills you need in a pre-assembled, easy to
install kit, that when finished, adds only one small wire to your system and
does not change the way the switches are connected to the bike. Designed and
manufactured by a Harley Rider, for Harley Riders.
What it does !
The standard switch
Up - On when on LOW beam
Down - OFF
With the kit fitted
Up - On when on LOW beam (no
change)
Centre - OFF (no change)
Down - On when on HIGH beam (is
that cool or what !)
With the kit fitted (alternative method 1)
Up - On when on LOW beam (no
change)
Centre - OFF (no change)
Down - On ALL the time (by
popular request !)
With the kit fitted (alternative method 2)
Up - On ALL the time
Centre - OFF (no change)
Down - On when on HIGH beam
Many thanks to my friends Chris and the gang at
Spiyda Designs for creating
this, and several other very nice components and kits for making our rides
unique and better than original!! Pay them a visit and do some shopping for you
baby! They even take PayPal!! ![]()
Installation tip: Install the switch to the LEFT side of your nacelle, and reverse the two nacelle switch bike connections (they are interchangeable), so you end up with your lesser used auxiliary switch on the RIGHT side and your passing lamp switch on the LEFT side, where it ought to have been in the first place!! :-)