Touring Model Front Motor
Mount Replacement
|
Easy guide to replacing
that sagging, ragging and nagging front motormount!
|
|
About a year before this job was done, I suspected that I might be
having some problems with my front motor mount on the 2002 Road King,
because I rode a friend's bike with a similar stock setup, and his bike
just "felt" different. It felt softer somehow, while mine seemed to have
a hardness about it. I probably would not have given it a second
thought, had I not ridden the other bike. However, recently I developed
a loud rattle at idle and deceleration that I was able to track to a
point where the left side exhaust header was actually TOUCHING my
primary chain case! I could not adjust the space by working with the
exhaust, so I suspected that the front of my engine was sagging, closing
that gap between the rear and my exhaust. Since my bike was fitted with
a low mounted HD oil cooler, I had virtually no clear view of the front
motor mount, but was sure that it had to be the culprit, so I ordered
the parts and set aside a nice afternoon for some shop therapy. :-)
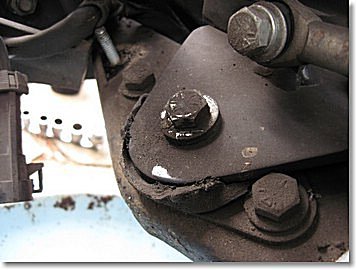
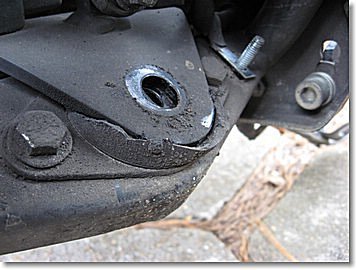
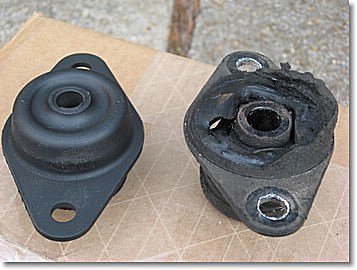
As you can see from the photos, surgery was DEFINITELY in order! The top
side of the motor mount had collapsed, and had literally punched through
the plate. leaving most of the rubber isolating material hanging
uselessly from the bottom!
Replacing the front mount is a relatively simple operation,
requiring no special tools, other than a few wrenches, socket set and a
small jack for supporting and lifting the engine, along with a couple
hours of relaxed shop time. Don't expect to find instructions for this
job in the service manual. It's just one of those little things that
they assume we already know. ;-)
Tools Required:
For Regulator Removal: 7/16 deep well socket and extension.
For Motor Mount-to-Bike Bolts and Motor Mount Center Bolt: 9/16 wrench
and 11/16 wrench or socket.
For Stabilizer Link bolt: 9/16 wrench or socket
For Plate-to-Motor bolts: 9/16 Wrench and 9/16 socket or additional 9/16
box wrench.
|
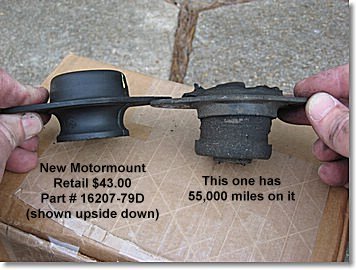
As you can see below, the motor plate has
destroyed the top side of the rubber isolator and eaten its way
almost completely down to the metal base plate.
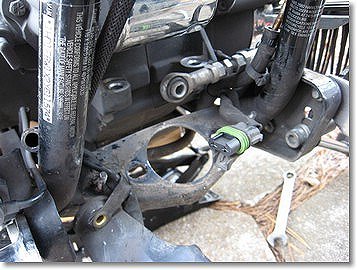
The first order of business is partial removal of the Voltage
Regulator to gain access to the mount. Simply remove the two
7/16 nuts that secure the regulator to the frame cross member
(notice the bare studs in each photo that the regulator sits
on). The regulator can supported to the right hand side
by a bungie or hanger wire, but will need to be disconnected from the
harness on the left side (connector lies directly beneath the
regulator). |
|
 |
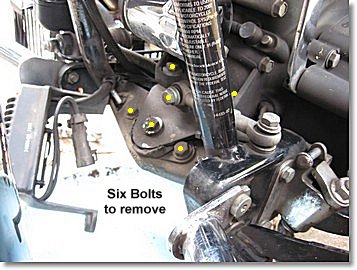
There are a
total of six bolts that must be removed to replace the motor
mount. Shown in the photo here with yellow dots, remove the
lower three bolts first, then remove the stabilizer link bolt,
and finally the two upper plate-to-engine bolts.
Those upper plate bolts are a bit tricky to get
to if your engine is sagging as much as mine was, but I was able
to "stand" an open end 9/16 wrench on the bottom nuts, and break
the bolts loose from the top with a second box end 9/16 wrench.
NOTE: Due to the severity of
my collapsed mount, it was necessary to remove the engine
support plate. You may find it only necessary to loosen the
plate bolts in order to pull the mount out from underneath the
plate.
|
|
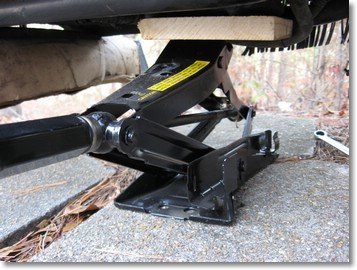
BEFORE YOU
REMOVE THE UPPER BOLTS, you need to place a small jack under the
engine case to support the engine and lift it lightly off the
old motor mount. I used a scissor jack from the trunk of my car
and a small block of wood to protect the engine case from the
jack. At this point, you only want to lift the engine enough to
know that it is supported by the jack (you'll see the engine
plate begin to lift off the motor mount).
Now you can safely remove the two
plate-to-engine bolts, and slide the plate out free of the bike.
|
|
After the engine plate is
removed, the already unbolted motor mount will lift off the top
side of the cross member. You'll have to carefully lift the
engine with the scissor jack until the old mount will clear the
cross member. Don't go any higher than you HAVE to, or you'll
cause problems somewhere else on the bike!
During
re-assembly, leave all bolts slightly loose until you have them
all in place, then tighten the two plate-to-engine bolts first,
the stabilizer link bolt second, the motor mount center bolt
third, and lastly, the two motor mount-to-cross member bolts.
Reconnect the regulator to the harness, and replace the
regulator. A little blue Loctite is never a bad idea for
external bolts and nuts.
Some Techs
suggest leaving all mount bolts slightly loose, then running the
engine for a brief period to "center" the engine and parts, THEN
tighten to specs. Proceed at your own risk here.
Note:
Some early models had a problem with dangling connectors getting
beaten up by the bouncing engine. If yours isn't snapped to the
bottom of the regulator, run a black plastic zip tie around the
regulator, securing the connector to its underbelly so it
doesn't come in contact with moving motor parts.
|
|
| The
new mount on the left certainly looks nicer than the old worn
out one!
:-) Notice how the rubber center material has been forced
through the plate leaving almost nothing between the engine
plate and the mount base plate! (Sorry, the new mount is shown
upside down in these photos) Want to keep that softer
ride?: See alternate part number note at bottom of the page! |
|
|
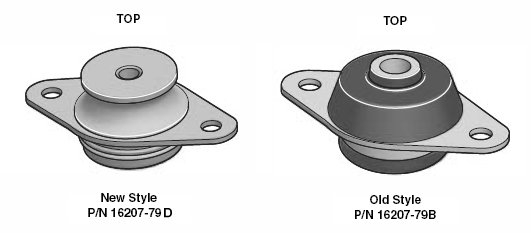
This is what they are SUPPOSED to look like!
 |
I spent about two hours on this project, but knowing what tools I
needed ahead of time and what the sequence of steps were would have
saved me a lot of that time. Even still, I'd recommend that unfamiliar
do-it-yourselfers allocate themselves a nice afternoon under the shade
tree or an evening in the shop for the job.
I used a bike lever jack to stand the bike upright for this project,
but if you have no means of keeping the bike upright, I'm quite sure the
job would work almost as easily if done on the sidestand. You might need
to be a bit more cautious with the scissor jack to make sure it can't
slip if it has to lift on an angle.
ALTERNATE PART NUMBER: The new part number for HD touring
bikes (16207-79D) is a much harder compound than the early versions, and
changing to this new mount will increase the felt vibrations on the
bike. The new mounts were beefed up to reduce deterioration from oil
contamination, which sometimes occurs during oil changes. If you prefer
the softer feel of the early mounts, you can purchase a BUELL motor
mount, part number L0501.2, which is the same part as the early
touring model mounts ending in "C". If you use the Buell mount, it installs exactly
like your old one, and in the same upright orientation.
|