Handlebar
Risers
|
An easy
alternative to installing new handlebars
|
|
If you like the feel of your current handlebars, but
just need them in a different position, consider the
addition of a quality set of straight or pullback risers
to lift and/or move them back a few inches. This can make
all the difference in the world on back and shoulder
comfort without the endless task of trying out forty
bazillion different styles of handlebars, and eliminating
the tedious work of changing all the controls, wiring and
grips over to the new bars.
Risers are generally a more expensive alternative to new
bars, but the cost is offset by the advantages of not
having to do a complete swap, and retaining the original
"feel" of the bars.
Usually priced between $50.00 and $150.00, risers are an
easy installation, and usually can be utilized with no
additional cable or hose lengths, although some may
require a slight re-routing of the throttle cables.
They come in a variety of styles and heights, both
straight and with a slight rearward bend. The easiest way
to get a good idea of what you need is to find a safe
place to ride on some straight road, and move your hand
position around to get a "feel" for where you
want your hands to be (cruise control helps a lot here).
For me, grasping the mirrors put me pretty much where I
wanted to be, so I knew I need approx 2" more
height, and a little pull back would give me a more
upright posture for long ride comfort.
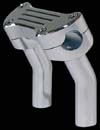
ROYAL STAR (YAMAHA) RISERS
by PRO-ONE
|
| The Royal Star risers by Pro-One
can be purchased through Parts Unlimited or from
Accessories
Int.( Part # PRO801250 ) or directly from
Pro-One
for around $100.00. These come with solid one
piece caps and bolts, and only need the addition
of a pair of 3"x1/2" hex bolts to
install them to the triple tree. |
|
DRAG SPECIALTIES PULLBACKS
(for Harley Davidson)
|
Basic 4.5" pullback risers are available from
most any Harley Davidson shop at a modest cost of around
$30.00, but this is for the uprights only with no caps or
hardware. You will need to also purchase a Harley style
riser cap, cap bolts, and 3" to 3.5" x 1/2"
hex bolts to mount the risers to your LC triple tree. (3.5"
bolts may bottom out on you, and require the use of a
couple of washers for spacers, but will give more thread
bite for strength)
Be aware that the bolt spacing of the LC triple tree is
slightly wider than the bolt spacing on one-piece Harley
riser caps. Some people have cut the HD riser caps and
wrapped the caps in leather to hide the cut, Click here to see a cut riser cap
setup. but HD now offers a set of "Split Caps"
that do not need any cutting or covering. Others have
simply installed all parts loosely, to get the bolts in
place, then tightened everything down. While leaning
in the risers will work, it is not recommended. The
contact surface of the clamps is reduced due to the lean,
and there is a larger danger of too much pinch torque in
too small of an area on the bars. In other words, you run
a higher risk of bending or breaking your bars at the
outer end of the riser, should you ever need to tie the
bike into a trailer.
Here's a shopping list for the Drag Specialties,
including split caps:
Drag Specialties 4.5" Pullback Risers $ 25.90
Harley Billet Split Riser Caps (Harley Part #56057-00) $
59.95 (Alternative source at
J&P Cycles for $26.95 Item number
5000874)
Chromed Riser Clamp Screw Set $ 4.95
Chrome Screw Cap Set $ 2.37 (buttons to cover the screw
tops)
3.1/2 x 1/2 Hex Bolts (2) $ 1.30 (any good hardware store)
7/16 Flat Washers (4) $ 0.40 (I needed to use these as
spacers under the hex bolts)
TOTAL COST - $94.90
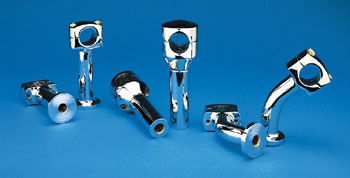
DOMETOP STRAIGHT RISERS
and PULLBACKS by PRO-ONE
|
| Available through
J&P
Cycles and other distributors, the Pro-One
risers are very high quality and many come with
matching caps and cap screws. You may still need
to change out the large mounting bolts which hold
them to the triple tree to 3.5 x 1/2" hex
bolts. |
|
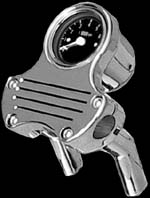
COMBINATION TACH and
PULLBACKS by PRO-ONE
|
|
Pro-One
also is now offering their combination tach and
riser kit for the LC 1500. At a price of $189.95 (with free
shipping) from
Phat Performance Parts,
you get a great looking setup, and still with no
cable or wire changes (other than wiring the tach). |
|
RE-ROUTING YOUR THROTTLE
CABLES:
|
If your risers lift your bars more than three inches,
there is a good chance that you will need to re-route
your throttle cables to a new position BEHIND the upper
tripletree plate to allow full turns both ways with no
tension on the cables. Be aware that ANY tension on the
throttle cables can pull your carbs right out of the
intake manifold!! This is not a kewl situation to be in!
The easiest way to re-route throttle cables is to simply
remove them from the throttle control at the grip, by
removing the retaining plate to the cables from beneath
the control unit, then opening the handlebar control unit
and slipping the cable ends off the throttle and out the
control. Next, pull both cables from the left side of the
frame neck to bring them out from the bulkhead piece, and
push them right around the frame neck, and up behind the
upper triple tree plate, then re-install them. This
method does not require any adjustments to the cables
afterward.
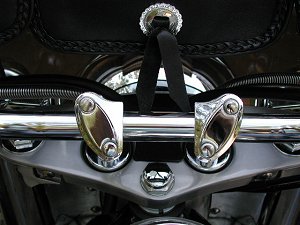
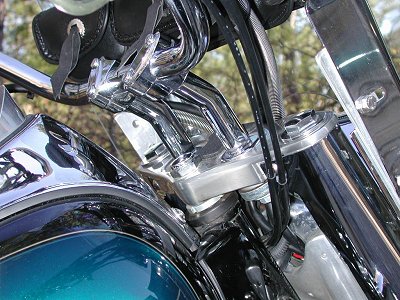
Here's a photo of what they should look like when
finished: Cables
(larger view of Drag Specialties above)
My cables get very slightly squeezed between the triple
tree and the speedometer console on a full right turn,
but not enough to cause any problems whatsoever.
A helper is invaluable for preserving
the integrity of your paint job!! (ask me how hard it is
to find this out!) Have your helper maintain a good grip
on your bars while seated on the drivers seat, while you
do all the work. Also, it's a highly recommended tip for
you to place a blanket or towel over the gas tank or air
box (on the LC), just in case your helper is daydreaming!
First, break the torque on the large riser mounting bolts
under the top triple tree by turning the handlebars all
the way until they lock and unscrewing the bolts a little
bit. Then do the same with the riser cap bolts.
After all bolts are loosened slightly, remove the OEM
riser caps and have your assistant hold the bars while
you remove the risers. (Your assistant can rest the bars
on the tank if you trust him/her not to dose off!)
Now, just loosely install the new risers and caps until
everything is in place and fairly snug. Then torque down
the large mounting bolts, and adjust the bars to your
liking, then tighten the cap bolts.
Check that there is no binding or pulling on the cables
or hoses when the front end is moved to its maximum
limits, and do any re-routing that may be necessary to
finish the job.
Have fun and treat yourself to some quality, laid back
"cruise" time!
|
