|
|
(Note: I no longer make or sell these adapter kits, but will leave this page up for those who wish to make their own.) |
Before you write off that excellent quality OEM Suzy windshield in favor of a taller aftermarket shield of less quality, consider building or buying an extender plate set for the mounting hardware. For only a few bucks, a trip to the hardware store, and some quality shop time, you can add 1.5" to 3" height to your expensive Suzuki shield, and have the advantage of changing it's height as the weather changes.
Want it easy? GManIndustries is now producing these kits, along with
an option to add chromed Harley style lower wind deflectors for even
better air control!! Check them out at
www.gmanindustries.com
Personally, I like a taller shield in the colder months,
and a shorter one (for more air) in the summer, and this
setup gives me the best of both.
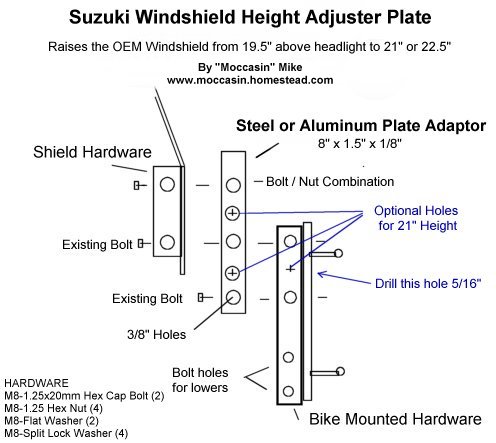
Click this link to see a drawing of the extender plate setup for reference. Then if you wish to build your own, here's what you have to do.
BUILD IT YOURSELF: |
| You will need the following hardware: | |
| Aluminum or Steel Flat Stock 1/8"x1.5"x8"
(2) M8-1.25x20mm SS Bolts (2) M8-1.25 SS Nuts (4) M8- SS Flat Washers (2) M8- SS Split Lock Washer (4) (I prefer to use Stainless Steel (SS) nuts bolts and washers to avoid rust or corrosion) Graduated Drill Bits up to 3/8" size. Hacksaw (for cutting the plates) Grinder or File (for smoothing the plate edges) |
|
1.) Purchase a piece of 1/8"x1.5"
aluminum or steel flat stock from your hardware store,
and cut two 8" pieces off of it. Smooth the cut
edges with a file, grinder or Dremel tool.
2.) Remove the Suzy windshield and
remove one of the brackets from the shield that has the
slotted holes in it. (This is the piece that the bolts go
through to hold it to the bracket that mounts to your
bulkhead.)
3.) Using the shield bracket as a
template, scribe or mark the location of its holes onto
the extender plate, Then move it up until the bottom hole
lines up with the upper scribe mark, and mark the upper
hole's location onto the plate. Now, move the bracket
down half way between the first two scribe marks, and
scribe both holes onto the plate again. This will leave
you with a total of five scribe marks on your plate. Each
of these holes should be drilled to a maximum size of 3/8"
(no slots, just holes).
INSTALL IT: |
|
1.) If you wish to have the option of
a 21" high shield, you will need to locate and drill
a 5/6" hole in the brackets that are attached to
your bike. Do this by bolting the extender plates to the
bottom shield mounting hole (see drawing), and center
punching the brackets at the center of the #2 hole (up
from the bottom) in the plate. Use a scrap piece of plate
behind the bike bracket to avoid damaging the fork tube
covers when the drill goes through the bracket. (For a
cleaner hole, you should start with a small bit and work
up to the 5/16" bit).
2.) Using your existing bolts and
washers, and the additionally purchased bolts nuts and
washers above, mount your plate to the bike bracket by
the bottom hole, then mount your windshield through
either of the two remaining pairs of holes in the plate.
At 6' with a rider's backrest, I found that the 21"
is a perfect height, but for colder weather, I may raise
it to the 22.5" holes and look through the shield
for more protection.
Raising the shield in this manner will of course leave a
corresponding void between the bottom of the shield and
the headlight and lowers. This void does not cause any
air turbulence to the rider whatsoever, and although it
may look a little odd at first (click for photo), it is well
worth the effort. I have tried the taller aftermarket
shields, and they don't do nearly as good a job at
smoothing out the air as the Suzuki combination of shield
and lowers does.
