Studding
Your OEM Seat Covers
|
Add some
personality to that boring but
comfortable seat!
|
|
If your butt likes your seat, but your seat hurts your
eyes, consider adding some character to its skin with
some easy do-it-yourself studs and conchos. A few dollars
and a few basic tools, a little time and some courage is
all it takes .
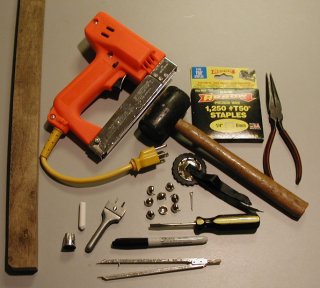
Rubber Mallet
Scrap Piece of Wood
Common Thimble
Protractor (Optional) or Small Ruler
Studding Tool (Optional for Leather)
Small Flat screwdriver
Electric Stapler with 1/4" Staples
Chalk
Masking Tape (not shown)
Needle Nose Pliers
Ice Pick (not shown)
Sharpie Magic Marker |
 |
The Studding Tool is only required if you are studding
leather. This tool is designed to pierce preset holes in
leather to match the tabs on the studs. Available from J&P Cycles for
less than $20.00. Order part no. 16-0966
Chromed 1/2" Spots are also available from J&P Cycles for
approx $2.00 per pack of ten. Item no. 29-098 It takes
about 75 spots to do a typical LC 1500 front and rear
seat combo.
My favorite concho is the Ace Leather
Company 1.5" concho with included escutcheon and tassel. You can buy
these through J&P (Item # 110909 $5.99 ea.), however, I ordered some
once from J&P and they substituted a cheap stamped tin version, which I
sent back. Make sure they are sending you the ACE brand. The Ace conchos
are thick, heavy cast metal, and not flimsy stamped sheet metal. They
are an antique silver finish, and are not as shiny as the chrome plated
stamped ones, but I think that adds a lot of character to them. They
come with black tassels. The ones you see on my bike have been retied
with a set of Iron Braid teal tassels sistered with the Ace black.
A protractor is helpful for accurate spacing of the studs,
but a small ruler can also be used fairly well.
1.) With the seat on or off the bike, make a chalk
line of the stud design that you want to create, and
starting at the forward ends of both sides, mark the
location of each stud with a cross mark. Work your way to
the back from both sides. Common stud spacing is 1.25"
inches center to center. When the two stud lines meet at
the back of the seat, you may have to slightly alter the
last two or three marks to even the spacing up. Mark and
"x" at any point where you will want to add a
concho.
2.) Step back and stare at it for a while and see if you
like the design. If not, wash it off and start over. If
so, let's go to work!
3.) If you are adding conchos, take an ice pick and
pierce the cover at the concho "x" while the
cover is still on the seat. Now take a sharp magic marker
("Sharpie") and push hard into the ice pick
hole. This is to mark the foam for later.
4.) Carefully inspect the underside of your seat to
locate any pre-existing marks or notches which will be
helpful in re-installing the cover. On the LC, the OEM
cover has four small notches at the edge which are used
to center the cover on the seat. Also make notes as to
any unusual folds or overlaps in the material.
5.) Use masking tape on the plastic base to locate the
point at which the notch rests on the base. Placing the
tape against the edge of the cover will also show you how
much to stretch the seat cover upon re-installation.
6.) Carefully pry out the old staples with a small bladed
screwdriver, or staple puller. Locate the icepick/marker
mark in the foam as you remove the cover, and draw a
circle around it with the marker so you won't lose it
after the cover is off.
7.) With the cover off. Simply lay it over a scrap piece
of wood, place a stud centered over the first cross mark,
press slightly against the wood and slide the stud and
cover to the side just enough to "scratch"
holes in the cover with the stud tabs.
8.) Lift the cover off the wood and push the stud fully
into the material, then use the thimble to fold the tabs
in toward the center of the stud. Now use the edge of the
thimble to press into the center of the back of the stud.
This will push the tabs deep into the hollow of the stud.
9.) Proceed to the next stud until you've finished the
whole line.
The traditional method of attaching conchos to leather
is to tie a bleedknot in the leather tassel after
threading it through two slots in the concho, leather
escutcheon, and base material. Many conchos today come
pre-tied and are installed by either a plastic zip tie or
adhesive to the base material.
Here's a quick, easy and secure way to attach any pre-tied
concho to your seat:
If your concho came with a leather escutcheon, you can
use it as a backing plate behind the seat cover. If not,
cut a small disc of leather from an old belt, with a
small hole in it's center. Spread open a 1" or 1.25"
zinc plated cotter pin and push it over the cross bar in
the center of the concho (from the front), then squeeze
it back together and push it through the seat cover at
the "x" mark, and place the leather escutcheon
over it, sandwiching the cover between the leather and
concho. Now with a pair of needle nose pliers, you can
bend the cotter pin legs out tightly against the leather
escutcheon. Slightly curl the ends of the cotter pin so
that they press into the leather and don't snag on the
foam later.
Before you replace the seat cover over the seat, you will
need to trim out a depression in the foam to allow for
the size and thickness of the concho escutcheon, so it
will lay smooth along the seat and not be bumped outward.
This can be done with a single edge razor or exacto knife.
Re-Stapling the cover on is a two person job, but is
very simple to do.
Have an assistant hold the seat at the proper angle for a
straight down stapling shot, and hold the cover in place
on the seat base. Then with the electric stapler in
position to fire, place your free hand on the head of the
stapler and press down hard! Then pull the trigger. If
the angle is straight in and the pressure is firm, the
staple will drive right in. If not, it will collapse.
Pull it out and try again.
Staple the four basic pre-marked alignment points first,
then continue around the perimeter of the base.
 |
Click the photo
for full screen full bike detail
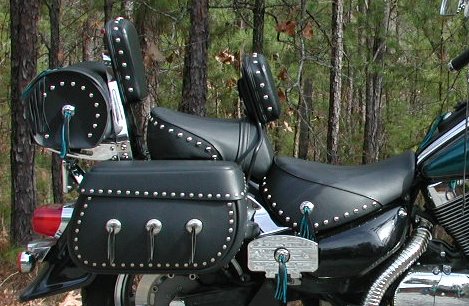
I also added studs and conchos to the leather
travel bag on the rear rack, using the stud tool. |
|

