Working with Multiple Images |
|
| It can be very annoying to open a two line
post and have to wait for 15 photos to load in the sig file area!!
AARGGHH!! Be nice! Post ONE!! Here's an easy way to have multiple images at your disposal to use whenever you feel they can enhance your post or reply. While not exactly a "Signature File", they work much the same way, and give you lots of flexibility with your postings, and give you maximum usefulness of whatever web storage space you have available (Delphi Plus currently gives you up to five megabytes of storage for photos). By keeping your photo files within reasonable 50-60kb size limits, you can store a ton of them in a five meg holding room! Delphi Plus allows you to "drag and drop" images from other sites
into your posts, so we'll show you how to take full advantage of that
for quick and simple photo additions to your posts. |
|
Simplify the Sig |
|
Let's start by creating a simple, generic signature file with no photos to display. That will leave your post open to any photo image that you want to add at the time, and not crowd the post with too much stuff. Here is a sample of my actual "Signature File" that I use on Delphi. <P align=center><A href="mailto:mocc@moccsplace.com?subject=Cycle_Stuff"><SPAN style="FONT-WEIGHT: bold; FONT-SIZE: 10pt; COLOR: blue; FONT-FAMILY: Arial,Arial">Snake Mail</SPAN></A><BR><A href="http://www.moccsplace.com/"><IMG alt="Moccs Place Suzuki Intruder Site" hspace=10 src="http://www.moccsplace.com/images/gif/snake.gif" align=middle vspace=10 border=0></A></P> This creates the following simple sig file:
|
|
Build a Photo File Source |
|
| Let's assume that you have 15
photos, all nice and resized and cropped for friendly message board
postings, and you've already uploaded them to your web storage space. |
|
Make'em Easy to Get To! |
|
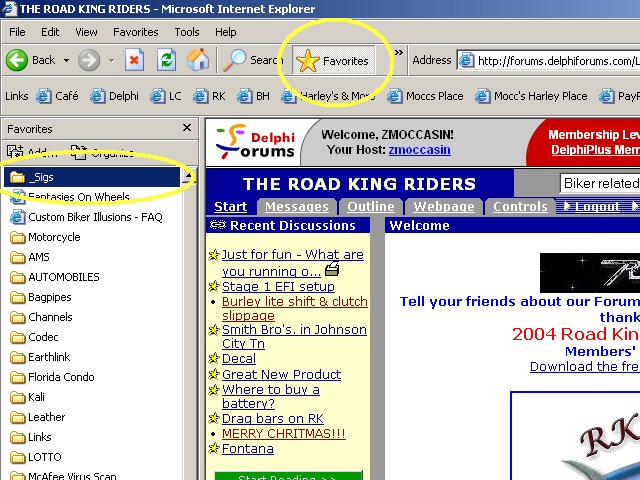
Now create a folder in your "Favorites" list on your Internet Explorer browser (I'm not familiar with other browsers) and call it "Sigs". You can right click in the Favorites pane and click "Create new Folder". I keep my sig folder at the top of my favorites list. |
|
|
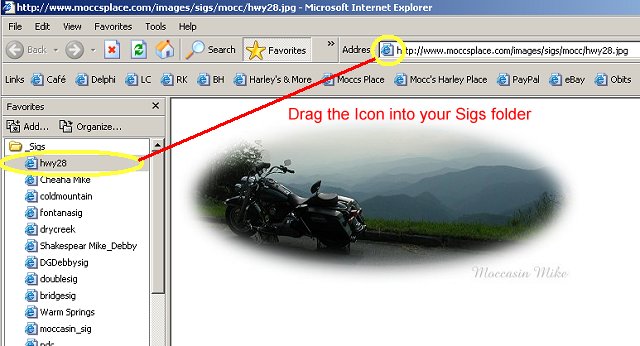
Take a few minutes to navigate your browser to each of your photos by entering the complete url to the photo in the address line and going to the photo. When your photo has loaded, click the explorer icon at the beginning of the URL and drag it into your sigs folder in the Favorites pane. Once you do this, you can then right click the shortcut in the favorites pane and rename it something simple if you need to. |
|
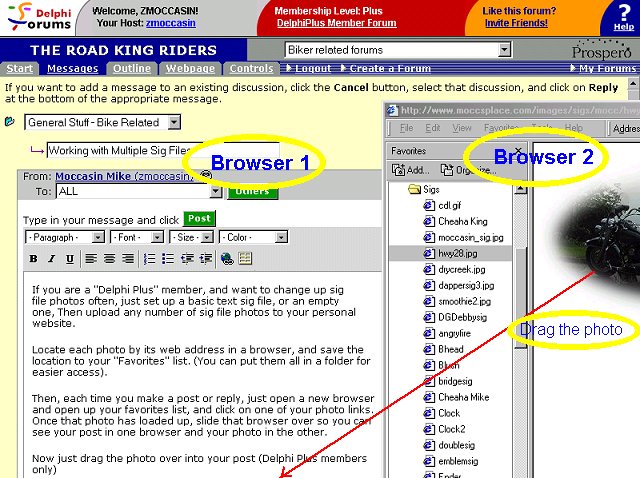
After you have all your kewl photos lined up and aptly named in your sig folder, you can easily get to and drag and drop them on your posts. When you're ready to add a photo to your post, 1.) Click the area of the post you want the photo to be placed (click the center icon as well if you want the photo centered), then 2.)Open a new browser, click on your "Favorites" button or command to open the Favorites pane. 3.) Click to open the Sigs folder in the list 4.) Click on the appropriate photo 5.) Slide the new browser over to expose your post behind it (it may help at this point to close the Favorites list), then 6.) Simply drag the PHOTO from your new browser right into your post! |
|
|
When I'm cruising the message boards, I usually have
a separate browser already opened to one of my sig file photos, and I
just use it back and forth to add photos to my posts. I definitely need
to get a life!! HAHA!! |
|
|
See ya on the boards, my friends!! |
|