Time for new rubber?
|
Save some chrome and
cruise money by doing some or all of the work yourself!
|
|
If you bought your bike to ride, and are getting your money's worth,
chances are, you're going to get on a first name basis with your local
shop guy just for tire changes! If you're already doing some of your own
maintenance, and want to save some stress on your budget, why not
do some of the labor yourself, and save the hassle of having to drop the
bike off or make an appointment and sit. (If you're sitting, you're
paying dearly for the privilege of sitting!)
With a jack and a few simple tools, you can significantly reduce your
tire change costs by removing your own wheels. Not only will this save a
pile of labor costs, but it will open the door for you to shop at other
non-Harley places for better tire prices. Any shop that owns a tire
changer can change your tires if you bring in the wheels, but they may
not have mechanics trained to work on your BIKE if you ride it in.
This is a start-to-finish tire change site, including removal and
replacement of both wheels, and for those who want to save more, we'll
show you what you need and how to change the rubber out as well,
enabling you to take advantage of great web and catalog sales on tires!
REAR WHEEL
Click images for Larger Format |
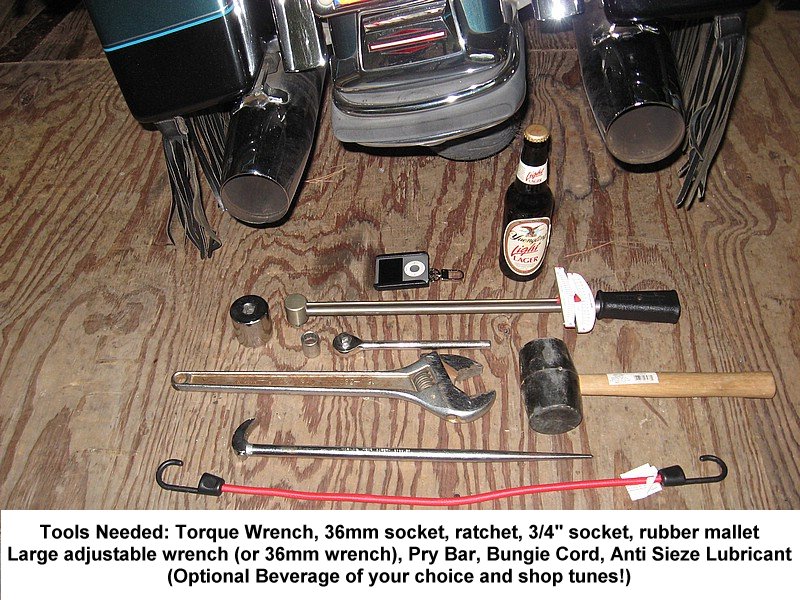
You'll save a lot of time if you already know what
tools you need for the job, so let's start with the basic list:
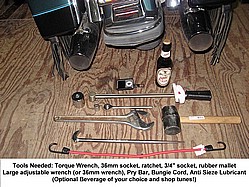
Service Jack / Torque Wrench / Ratchet / 36mm
Socket / 3/4" Socket / Bungee Cord / Large Adjustable Wrench (or
36mm Wrench) / Rubber Mallet / Tapered Pry Bar / Anti-Seize
Lubricant / Beverage of your choice / iPod full of Rock & Roll
Classics
Optional Muffler removal tools: 9/16" Socket / 1/2"
Socket / Rubber Strap Wrench (helpful but not absolutely
necessary)
|
 |
| Belt tension
rarely changes after the first few thousand miles. If you do
not need to change the tension on your belt, you can pull and
replace the rear wheel without removing the mufflers, and we'll
show you how to mark the axel for undisturbed belt tension. The
photos below are of a 2002 FLHR. Wheel removal is almost the
same on all touring models. |
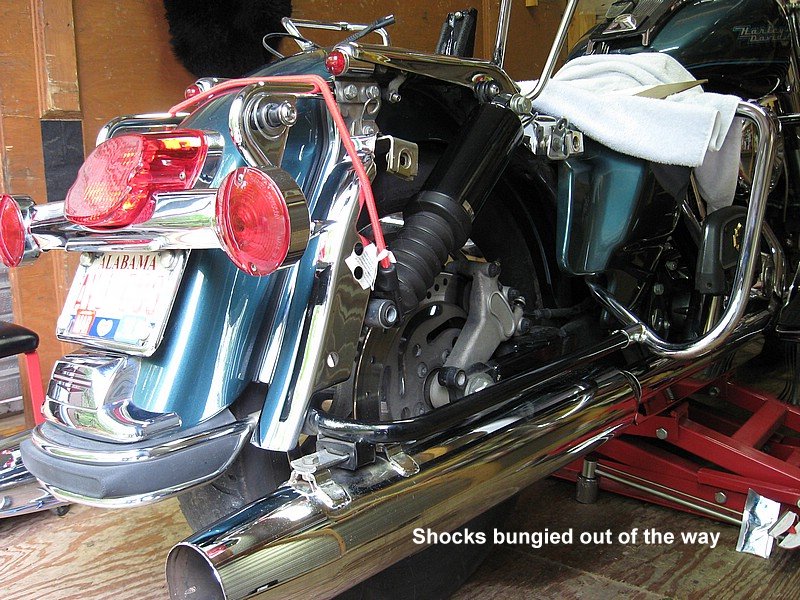
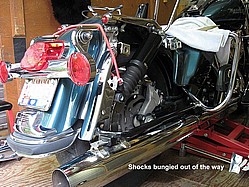
After removing
the saddlebags, and supporting the bike's weight by the service
jack, grab your 3/4" socket and ratchet and loosen the
top shock bolts, then remove the bottom shock bolts,
then use a bungee cord across the rear fender to hold both
shocks back out of your way. This method is used to avoid
removal of the mufflers. You can remove the mufflers for more
access, or if you need to adjust the belt, but muffler removal
can be frustrating, and will eventually require new Torca clamps
as well.
I don't pull my mufflers unless I need to. Saves
time, money and cuss words. :-)
|
|
|
Lower the service jack so that the rear tire rises to a
point where the axel nut is slightly above the saddlebag support
rail |
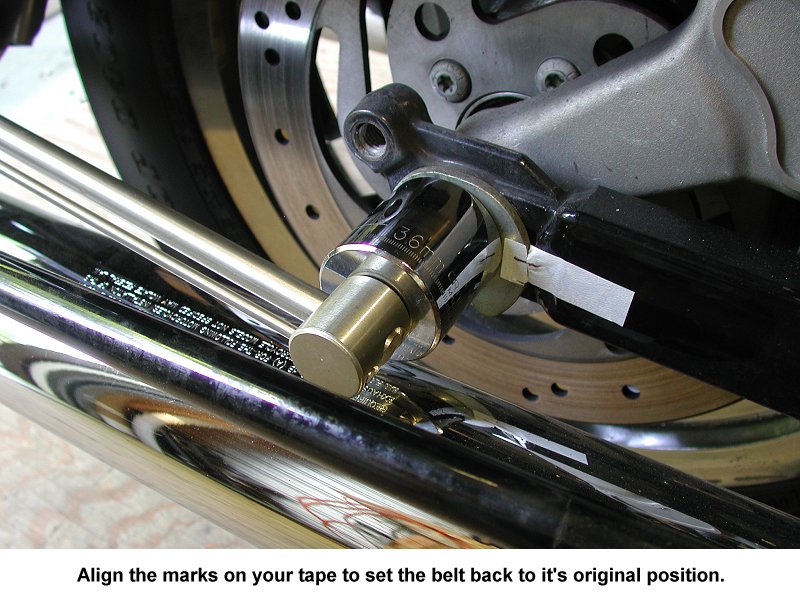
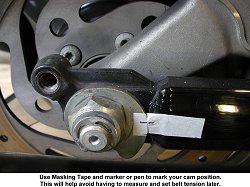
On 2002 and
later models, lay a strip of masking tape across the
axel cam and swingarm, then mark an index line on the tape where
it bridges over, and finally, slice the tape at the edge of the
cam plate. Do the same thing on the opposite side.
This is your belt tension mark, and will ensure
that your belt tension remains unchanged after the tire change.
Earlier models use a pair of adjustable axel
yokes at the back of the swingarm. Mark the top of the yoke
bolts with a marker, then count and record the number of
loosening turns you make to free up the belt, and turn BOTH
bolts exactly the same number of turns. On reassembly, tighten
both bolts equally the number of recorded turns.
|
|
Remove the
axel nut retaining clip (see previous photo), use your
36mm socket to remove the Axel cone nut, (100lbs torque, be
careful and make sure your bike is secure on the jack!) and the
right side cam plate.
Now, making sure that the axel and cam plate on
the left side will clear the saddlebag rail, push or tap the
axel out with your pry-bar or similar rod. If you have a tapered
pry bar like the one in the tools photo, it's point will
rest in the dimple on the end of the axel. Tap the pry bar
through with a rubber mallet if it is stuck.
|
|
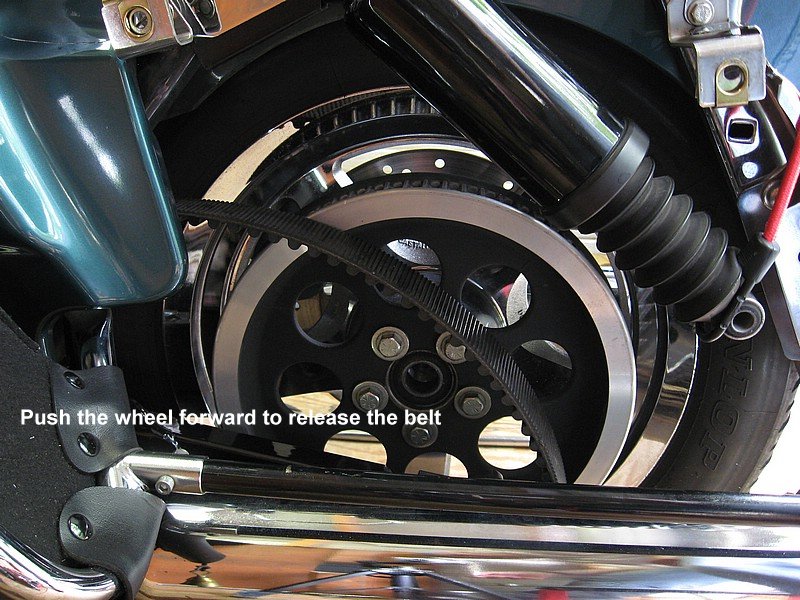
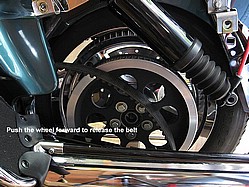
| With the axel removed, roll
the wheel forward to allow the belt to be released off the
outside of the pulley. The brake caliper support will slide
forward as the wheel is moved.
The swingarm will now drop down and the short right spacer
and long left spacer may drop out onto the floor, so keep an eye
out for them. |
 |
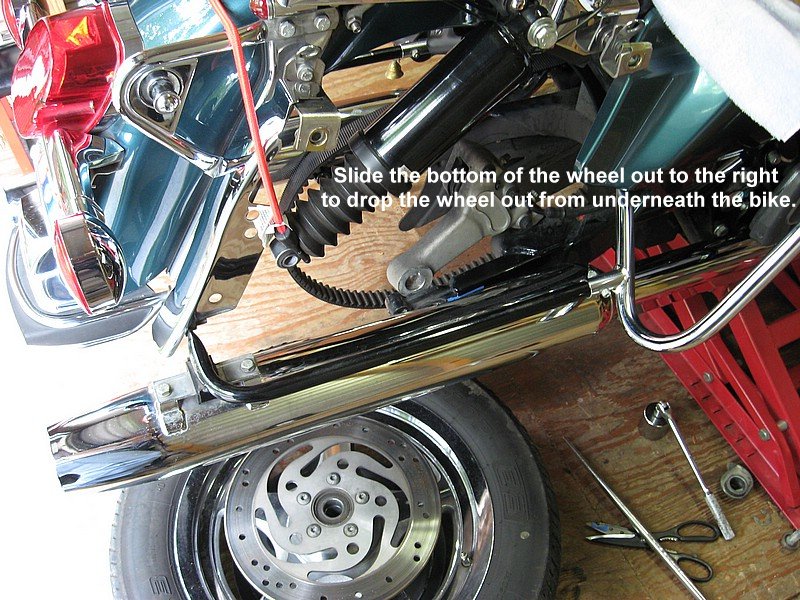
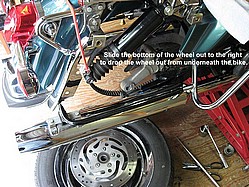
| Now ease the service jack up
as you work the wheel free from the brake caliper, leaving the
caliper in place on it's sliding tab. Once you get some height
on the bike, you can pull the bottom of the wheel to the right
and slide the wheel out from underneath the bike. |
 |
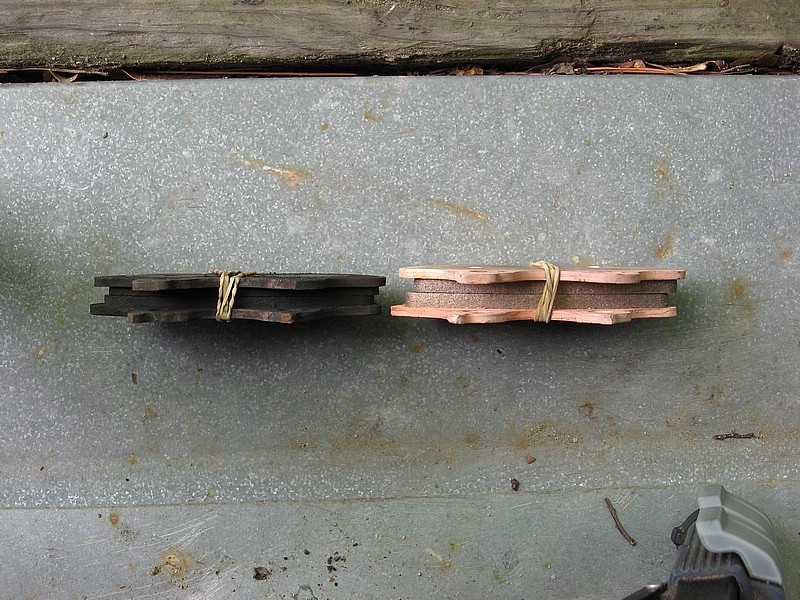
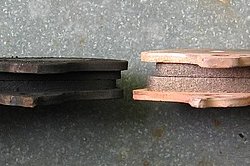
| Now is a REALLY good time to
inspect your rear brake pads!! They are much easier to replace
with the rear wheel off.
My rear pads were ok, but I'll be making several vacation
weeks in the mountains before this tire is gone and I don't want
to be concerned with the rear pads going before the tire does so
these are getting replaced with a new set for safety and
convenience.
Harley Part number for replacement pads for '00 to '07 models
is 44082-00D |
 |
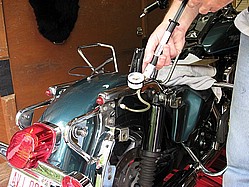
| Whether you
choose to replace your brake pads or not, spray the inside
caliper area around the pistons (between the pads and caliper)
liberally with brake parts cleaner spray to help remove dirt and
grime from the pistons and keep your brakes working smoothly. |
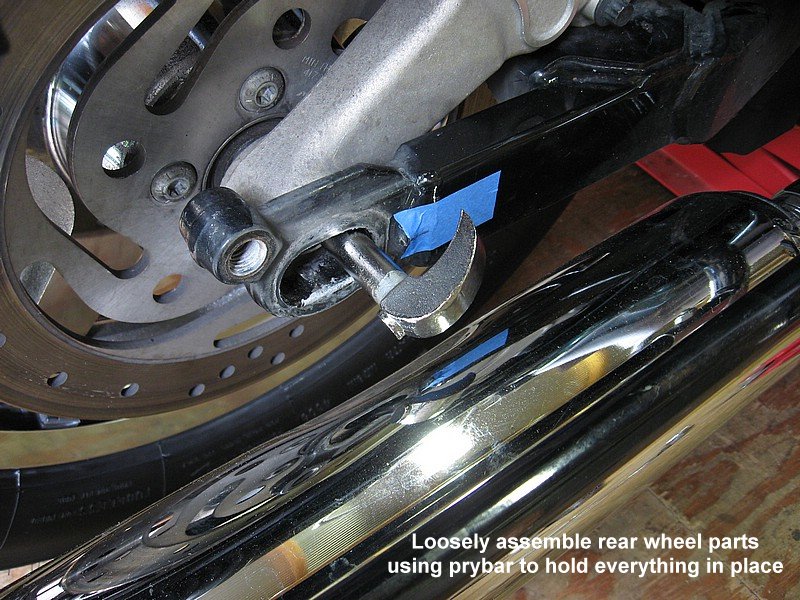
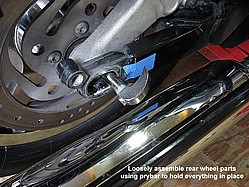
| Reassembly after the
tire is changed is simply reversal of the instructions above.
After pushing the wheel forward to loop the belt over the
pulley, Use the pry bar, to loosely assemble the wheel, spacers,
brake caliper support and swingarm. If the axel hasn't
previously been coated with anti-seize lubricant, clean off the
corrosion as best you can and wipe the whole axel down with the
lubricant. Then work the axel through from the left side,
pushing the pry bar out as you go. This part is a little
frustrating, but take your time, wiggle the parts, and it will
go. (this is where the iPod comes in handy! ;-) |
|
| Roll the axel forward by
twisting the welded nut on the left side, to set the cams at
some point looser than original, then push both sides of the
wheel forward to get good contact between the cams and the weld
nub on the swingarm. Tighten the axel to 15 ft-lb. of torque,
then slowly rotate the left nut until your belt tension
alignment marks line up. Now torque the axel nut to 100
ft-lbs.
On pre-2002 models, evenly tighten the axel yoke bolts the
same number of turns you initially loosened them. |
 |
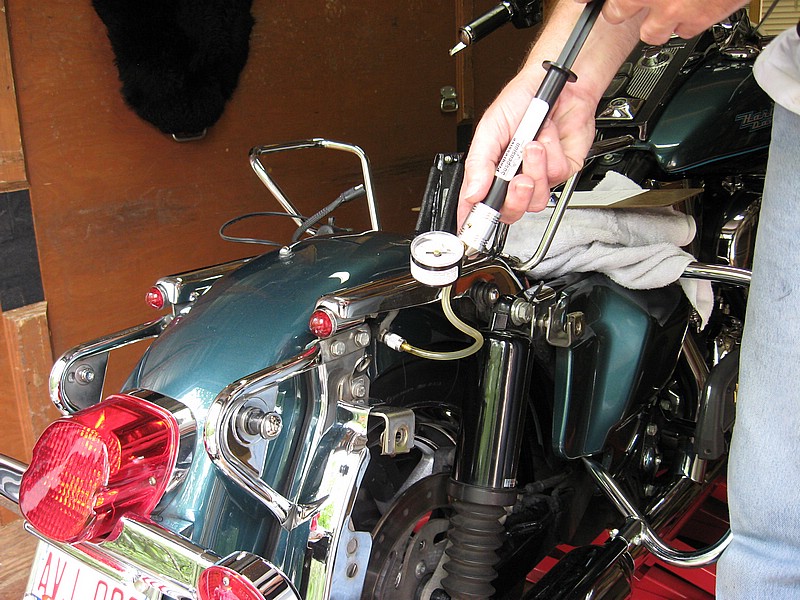
| Reinstall the shock lower
bolts and tighten both lower and upper bolts (35 ft-lbs).
Depress the brake pedal a couple of times to reset the brake
pads, and now's a great time to check and set your rear shock
pressure too! |
 |
| Take an easy test
ride and allow rainy-day braking distance until you are
confident that your tires are scuffed in and your brake pads are
properly seated.
|
Now, click here to follow me and we'll do the front wheel.
Or click here and we'll move over to the tire changer.
And here's a printable quick list of tools and torque values for you.
Tire Change
Tools PDF
|