Tire Change, Part II
|
Removal and Replacement
of the Front Wheel
Note: This
procedure is for a 2002 model bike. 2009 models and
possibly some earlier than that do not employ the use of
the drill gauge to set caliper alignment, but rely on
spacer contact. Consult your manual or advice from your
local shop to verify any differences.
|
|
On average, your front tire should last the usable life of two rear
tires. Some people prefer to change both out at the same time for better
handling, but if you're a half way conservative rider, you won't notice
the difference between a new front tire and a half worn front tire
unless there is tread damage or cupping involved.
There is nothing unsafe about running two different brands or model
of tires, front to back, on a cruiser or touring bike. Tread patterns
don't have to match and your bike doesn't care what you use. One end
steers and the other end trails, so there's no such thing as "mixing"
tires.
FRONT WHEEL
Click images for Larger Format |
The front wheel is a little easier, so let's grab
some tools and get to it.
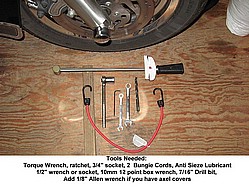
Service Jack / Torque Wrench
1/8" Allen Wrench (for Axel Cover - may vary)
10mm 12 point box end wrench for the Brake Calipers
1/2" Wrench or socket for the fork Pinch nuts
3/4" Socket for the Axel Bolt
7/16" Drill Bit to set right caliper alignment
2 Bungee cords - to hold the calipers
|
 |
Secure your
bike to your service jack!
Once the wheel is removed, the bike's weight will shift and
can cause it to fall off the jack if not properly secured. |
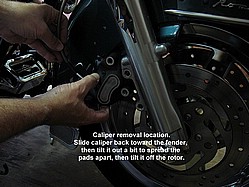
Remove the two
10mm caliper support bolts from the fork leg, then slide the
caliper about half way back off the rotor, and gently and slowly
tilt it out towards you as if you were trying to break off a
piece of the rotor with it. This will spread the brakes by
compressing the caliper pistons and make removal/installation
easier.
|

|
|
Now slide the caliper back to the fender and
simply lean it out towards you to free it from the rotor.
|
|
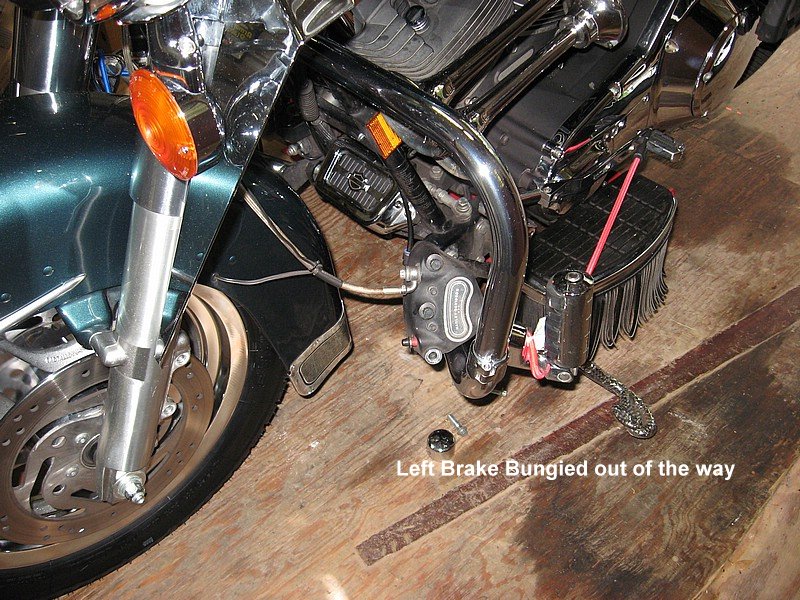
| Use two bungee
cords to secure the brake calipers back away from your work
area. You can hook one end into a bolt hole in the caliper and
hook the other end around the floor board or other spot on the
bike |
|
 |

|
| Remove the
axel nut on the left side of the bike, then loosen or remove
the pinch saddle from the left side by removing the two 1/2"
pinch nuts and pull the axel out.
NOTE: There are spacers on each side of the wheel, and
they are side specific. They will drop out when you pull the
axel, so make sure you set them on their respective sides of the
bike to keep from mixing them up. If you DO get them mixed up,
the short spacer goes on the bike's RIGHT side (the side with
the hole in the axel).
Your front wheel is now free of the bike. Jack the bike up
for clearance and slide or roll the wheel out from under the
fender, then head to the tire changer.
Since your front wheel appears the same on both sides, it's a
good idea to mark the tire rotation on the old tire with pen and
masking tape or chalk, and it wouldn't hurt to use some masking
tape on the wheel rim as well and mark a rotation arrow on it.
Tire changers get distracted sometimes, and this little trick
will help insure that you don't have to return to the changer
for a tire flip. Been there and done that a couple of times! |
Installation is the reverse of the above instructions,
but be sure to check the tire rotation before you install the
wheel to make sure you don't install it backwards!If your
axel wasn't previously coated with anti-seize lubricant, clean
off the corrosion as best you can and wipe the whole axel down
with the lubricant.
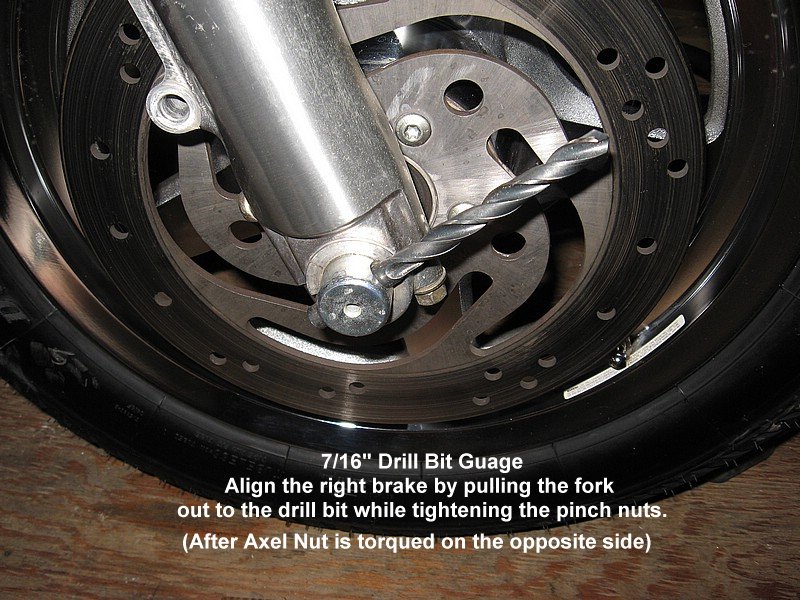
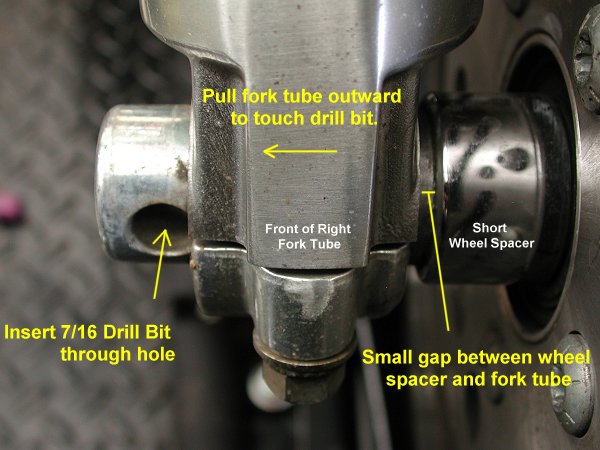
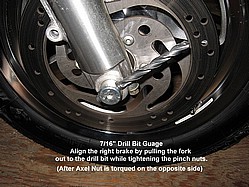
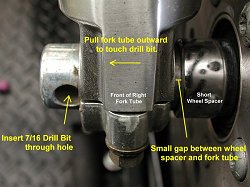
After loosely assembling the axel, pinch saddle, spacers and
wheel, torque the axel nut to 50 ft-lbs, then use a 7/16" drill
bit to set the left caliper alignment. Place the bit into the
hole in the outer axel, then pull the right fork tube out far
enough to hold the drill bit in place while you tighten the
pinch nuts. Torque on the pinch nuts is supposed to be 32
ft-lbs. |
|
 |
 |
| As we mentioned
on the rear wheel page, now is a REALLY good time to inspect
your rear brake pads!! Front pads are not difficult to replace
with the wheel on, but they are easier to see and easier to
clean while they are loose from the forks.
Harley Part number for replacement pads for '00 to '07 models
is 44082-00D (same pads front and rear)
|
Whether you
choose to replace your brake pads or not, spray the inside
caliper area around the pistons (between the pads and caliper)
liberally with brake parts cleaner spray to help remove dirt and
grime from the pistons and keep your brakes working smoothly.
Click here for more information on brake pad replacement.
|
| Again, take an
easy test ride and allow rainy-day braking distance until you
are confident that your tires are scuffed in and your brake pads
are properly seated.
|
Or click here and we'll move over to the tire changer.
Or
back to the Rear Wheel page
Here's a printable quick list of tools and torque values again for
you.
Tire Change
Tools PDF
|